For More Info!


How to Manage AWS CLI Profiles: A Quick Guide
When working with AWS CLI, you might have multiple profiles configured for different projects or environments.
This guide explains how to create, edit, delete specific profiles or remove all profiles in one shot.
VS CODE EXAMPLE IMAGE
Got it! Let’s go step by step.
Step 1: Verify AWS CLI Installation
First, check if AWS CLI is installed by running:
aws --version
If you see an output like aws-cli/2.x.x Python/..., it’s installed. If not, install it from AWS CLI official site.
Step 2: Create an IAM User in AWS Console

- Go to the AWS IAM Console.
- Click Users → Add User.
- Set a username and select Programmatic access.
- Attach the AdministratorAccess policy (or necessary permissions).
- Click Create user and note the Access Key ID and Secret Access Key.
Step 3: Configure AWS CLI in VS Code

- Open VS Code.
- Open Bash terminal (Terminal → New Terminal).
- Run:
aws configure - Enter:
- Access Key ID
- Secret Access Key
- Default region (e.g.,
us-east-1) - Output format (
json,table, ortext)
Step 4: Create an AWS CLI Profile
To set up multiple profiles:

aws configure --profile myprofile
Replace myprofile with your chosen name.
Step 5: Verify Configuration
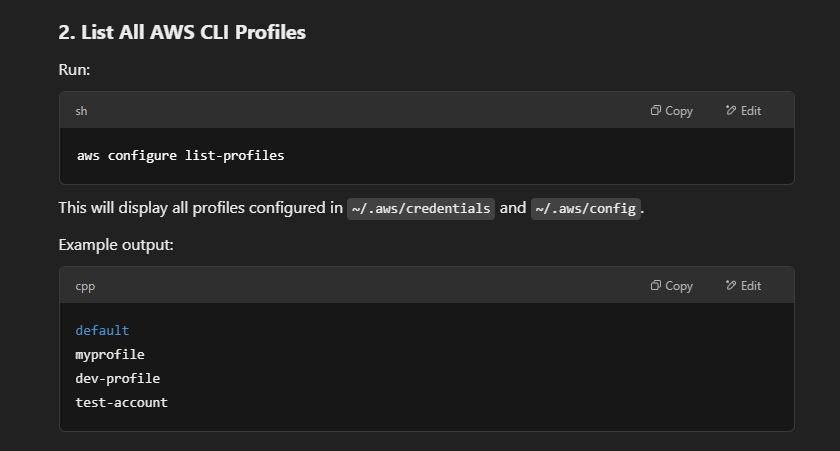
List all profiles:
aws configure list-profiles
Check active profile settings:
aws configure list
Step 6: Test AWS CLI
Try listing S3 buckets:
aws s3 ls --profile myprofile
If you get an output, it’s working!
1 – Delete Specific AWS CLI Profiles
Clear Profiles Without Deleting Files
If you prefer not to delete the entire .aws folder but still want to clear all profiles, you can simply empty the contents of both the credentials and config files:
- Open
~/.aws/credentialsand remove all profile sections. - Open
~/.aws/configand remove all profile configurations. - Save the changes, and your AWS CLI will no longer have any profiles configured.
part 1 : Credentials File
- Edit the Credentials File
Open the credentials file:
Copy and paste below code in bash terminal
code ~/.aws/credentialsThe file might look like this:
[default]
aws_access_key_id = YOUR_DEFAULT_ACCESS_KEY
aws_secret_access_key = YOUR_DEFAULT_SECRET_KEY

[profile1]
aws_access_key_id = YOUR_PROFILE1_ACCESS_KEY
aws_secret_access_key = YOUR_PROFILE1_SECRET_KEY

[profile2]
aws_access_key_id = YOUR_PROFILE2_ACCESS_KEY
aws_secret_access_key = YOUR_PROFILE2_SECRET_KEY
Find the profile you want to delete (e.g., [profile1]) and delete the block of text corresponding to that profile:

Deleting In VS code

Save the file after making the changes.
Part 2 : Open/edit the Config File
To remove the corresponding configuration for the deleted profile:
- Open the config file:
code ~/.aws/config
Similarly, delete the block corresponding to the profile you just removed (e.g., [profile profile1]):

Save the file.

2 – Verify Deletion
After deleting the credentials and config for the specific profile, you can verify by running a command using the profile:
aws sts get-caller-identity --profile profile1If the profile was successfully deleted, you should see an error indicating that the profile doesn’t exist.

Repeat these steps for each profile you want to remove individually.
3 – To Remove All Profiles in One Shot
To remove all profiles in one shot without manually deleting each one, you can simply delete the credentials and config files for AWS CLI. These files store all the profiles and removing them will delete all profiles at once.
Here’s how you can do it:
Delete the credentials and config Files:
- Open the terminal in VS Code or any terminal window.
- Run the following command to delete the entire
.awsfolder, which contains bothcredentialsandconfigfiles:
Bash terminal
rm -rf ~/.aws/
Verify Deletion:
After deleting the folder, try running an AWS CLI command:
aws sts get-caller-identityYou should get an error like:
Unable to locate credentials. You can configure credentials by running "aws configure".Or : The config profile (aws) could not be found

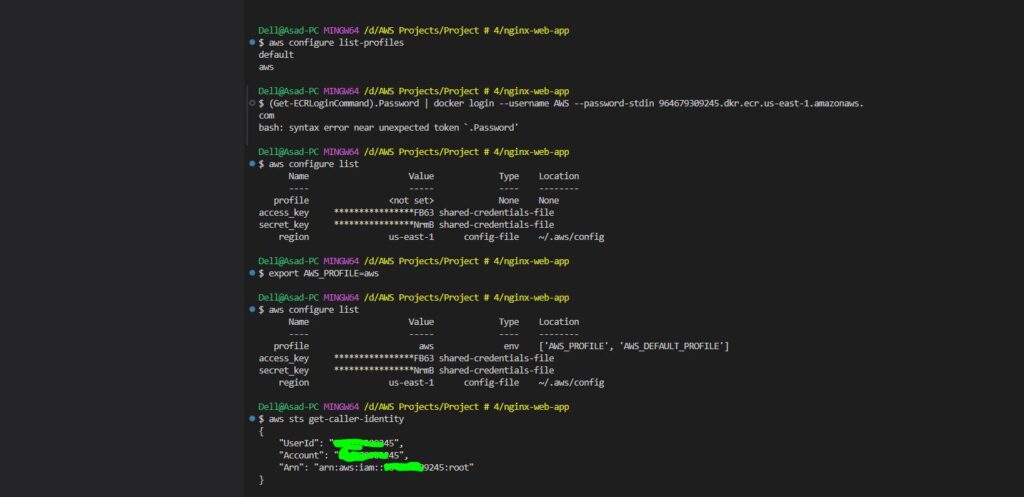
4 – List All AWS CLI Profiles
4 – View Specific Profile Details

5 – View Specific Profile Details

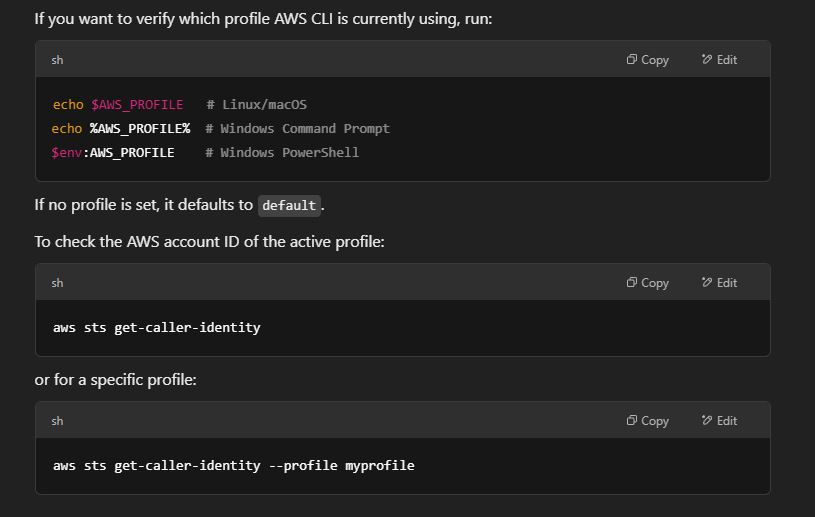
6 – Check Active Profile Being Used
Common Error Types
Dell@Asad-PC MINGW64 /d/AWS Projects/Build a Full-Stack React Application (main)
$ npx ampx sandbox
@aws-sdk/credential-provider-node – defaultProvider::fromEnv WARNING:
Multiple credential sources detected:
Both AWS_PROFILE and the pair AWS_ACCESS_KEY_ID/AWS_SECRET_ACCESS_KEY static credentials are set.
This SDK will proceed with the AWS_PROFILE value.
However, a future version may change this behavior to prefer the ENV static credentials.
Please ensure that your environment only sets either the AWS_PROFILE or the
AWS_ACCESS_KEY_ID/AWS_SECRET_ACCESS_KEY pair.
You’re seeing this warning because both AWS_PROFILE and AWS_ACCESS_KEY_ID / AWS_SECRET_ACCESS_KEY are set in your environment. The SDK is prioritizing AWS_PROFILE, but future versions might change this behavior.
How to Fix This
To prevent conflicts, you should only set one of these authentication methods.
Option 1: Use AWS Profile (Recommended)
- Unset the environment variables:
On Mac/Linux:
unset AWS_ACCESS_KEY_ID
unset AWS_SECRET_ACCESS_KEY
unset AWS_SESSION_TOKEN
or
unset AWS_ACCESS_KEY_ID
unset AWS_SECRET_ACCESS_KEY
unset AWS_SESSION_TOKEN
unset AWS_PROFILE
and verify with
env | grep AWSOn Windows (PowerShell):
$env:AWS_ACCESS_KEY_ID=$null
$env:AWS_SECRET_ACCESS_KEY=$null
$env:AWS_SESSION_TOKEN=$null
On Windows (Command Prompt):
set AWS_ACCESS_KEY_ID=
set AWS_SECRET_ACCESS_KEY=
set AWS_SESSION_TOKEN=
Error number 2
C:\Users\Dell>aws configure list
Name Value Type Location
—- —– —- ——–
profile None None
Your AWS profile is not set, which means your CLI might not be properly configured to authenticate with AWS. Here’s how to fix it:
Option 1: Configure AWS Profile (Recommended)
Run the following command to set up your AWS credentials:
aws configure
You’ll be prompted to enter:
- AWS Access Key ID
- AWS Secret Access Key
- Default region (e.g.,
us-east-1) - Default output format (leave blank or type
json)
After configuring, verify it:
aws configure listOption 2: Manually Set Environment Variables
If you prefer using environment variables instead of a profile, manually set them before running npx ampx sandbox:
On PowerShell:
$env:AWS_ACCESS_KEY_ID="your-access-key"
$env:AWS_SECRET_ACCESS_KEY="your-secret-key"
$env:AWS_REGION="your-region"
On Windows (Command Prompt):
set AWS_ACCESS_KEY_ID=your-access-key
set AWS_SECRET_ACCESS_KEY=your-secret-key
set AWS_REGION=your-region


Error Number 3

The command:
aws sts get-caller-identity
What It Does
This command retrieves details about the IAM identity currently authenticated in your AWS CLI session. It tells you who you are when interacting with AWS.
Output Example
Running this command will return JSON output like this:
{
    "UserId": "AIDAEXAMPLEUSERID",
    "Account": "123456789012",
    "Arn": "arn:aws:iam::123456789012:user/YourUserName"
}


Explanation
- UserId → Unique identifier of the IAM user or role.
- Account → The AWS account ID.
- Arn → The Amazon Resource Name (ARN) of the authenticated identity.
Why Use It?
- Verify which AWS account and IAM user/role you’re using.
- Debug AWS CLI authentication issues.
- Confirm if you’re using the correct AWS profile.
Example Use Cases
- Check active credentials:
aws sts get-caller-identity --profile myprofileThis confirms which IAM user is tied to themyprofileAWS CLI profile. - Confirm if you are assuming a role: If you’re using
aws sts assume-role, this command helps verify if the role is active.


This will make sure that the AWS_PROFILE is set to aws whenever you start a new terminal session.
Conclusion
Managing AWS CLI profiles is an essential skill for anyone working with AWS, especially when juggling multiple projects or environments. By following the steps outlined in this guide, you can easily remove one or all profiles, keeping your AWS environment organized and secure.
Remember, whether you’re working on a personal project or a team-based application, always ensure that you’re using the correct AWS profile for the task at hand. If you ever need to configure new profiles, you can easily do so by running the aws configure command.
Feel free to share this guide with your peers, and don’t hesitate to reach out if you need further assistance with AWS CLI!