For More Info!


How to Host an HTTPS-Enabled Website on AWS S3 with CloudFront, SSL & Route 53
Table of Contents
- Step 1: Create an S3 Bucket for Static Website Hosting
- Step 2: Upload Your Website Files
- Step 3: Request an SSL Certificate from AWS Certificate Manager
- Step 4: Create a Route 53 Hosted Zone and Add DNS Records
- Step 5: Create a CloudFront Distribution
- Step 6: Update Route 53 with CloudFront Distribution
- Step 7: Test Your HTTPS Website
- Conclusion
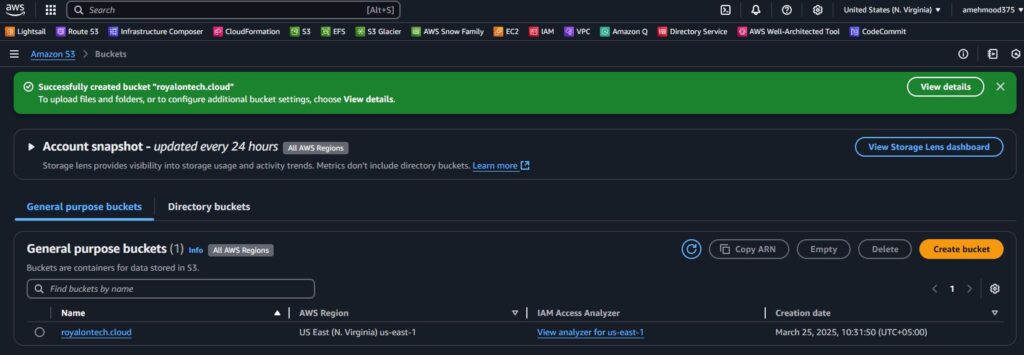
Step 1: Create an S3 Bucket for Static Website Hosting
Go to the AWS S3 console: AWS S3 Console
Click Create bucket.

Enter a unique bucket name (e.g., royalontech.pk).
Choose the AWS region closest to your users.
Uncheck “Block all public access”.
Enable static website hosting:

- Select “Enable”.
- Choose “Host a static website”.
- Set the index document (e.g.,
index.html).

Click Create bucket.
Step 2: Upload Your Website Files
- Open your S3 bucket.

- Click Upload and add your
index.html,CSS,JS, and image files. - Set public read access for the files by adding a Bucket Policy:
- Go to Permissions → Bucket Policy and paste the following JSON:
{
  "Version": "2012-10-17",
  "Statement": [
    {
      "Sid": "PublicReadGetObject",
      "Effect": "Allow",
      "Principal": "*",
      "Action": "s3:GetObject",
      "Resource": "arn:aws:s3:::example.com/*"
    }
  ]
}
Replace example.com with your bucket name.

Step 3: Request an SSL Certificate from AWS Certificate Manager


- Go to AWS Certificate Manager (ACM): AWS ACM
- Click Request a certificate.
- Choose “Request a public certificate”.
- Enter your domain name (e.g.,
example.comand*.example.comfor subdomains). - Choose DNS validation.
- Click Request.
- In the ACM console, find the CNAME records for validation.
- Add these CNAME records in Route 53 (see next step).
Step 4: Create a Route 53 Hosted Zone and Add DNS Records

- Go to Route 53: AWS Route 53
- Click Create hosted zone.
- Enter your domain name (e.g.,
example.com). - Choose Public hosted zone.
- Click Create hosted zone.
- Copy the NS (Name Server) records and update them in your domain registrar (e.g., GoDaddy, Namecheap, etc.).
- Once DNS is updated, add a CNAME record to validate the SSL certificate (from Step 3).
Step 5: Create a CloudFront Distribution

- Go to AWS CloudFront: AWS CloudFront
- Click Create Distribution.
- Origin Settings:
- Set Origin Domain Name to your S3 bucket URL (e.g.,
example.com.s3.amazonaws.com). - Set Origin Access to “Origin Access Control (OAC)”.
- Click Create new OAC, then Save changes.
- Click Yes, Update Bucket Policy to grant CloudFront access to S3.
- Default Cache Behavior:
- Viewer Protocol Policy: Redirect HTTP to HTTPS.
- Allowed HTTP Methods: GET, HEAD.
- Distribution Settings:
- Alternate Domain Names (CNAMEs): example.com.
- Choose the SSL certificate from ACM.
- Click Create Distribution.
Step 6: Update Route 53 with CloudFront Distribution

- Go to Route 53 → Hosted Zones.
- Click Create Record.
- Choose Record Type: A (Alias).
- Select Alias to CloudFront Distribution and choose your CloudFront domain name.
- Click Create Record.
Step 7: Test Your HTTPS Website

Open https://example.com in your browser.
Verify that HTTPS is working.
Your static website is now hosted on AWS S3 with CloudFront (CDN), SSL encryption, and Route 53 DNS management.

Conclusion
By following these steps, you’ve successfully deployed a secure and scalable static website using AWS S3, CloudFront, ACM, and Route 53. This setup ensures high performance, security, and global reach.